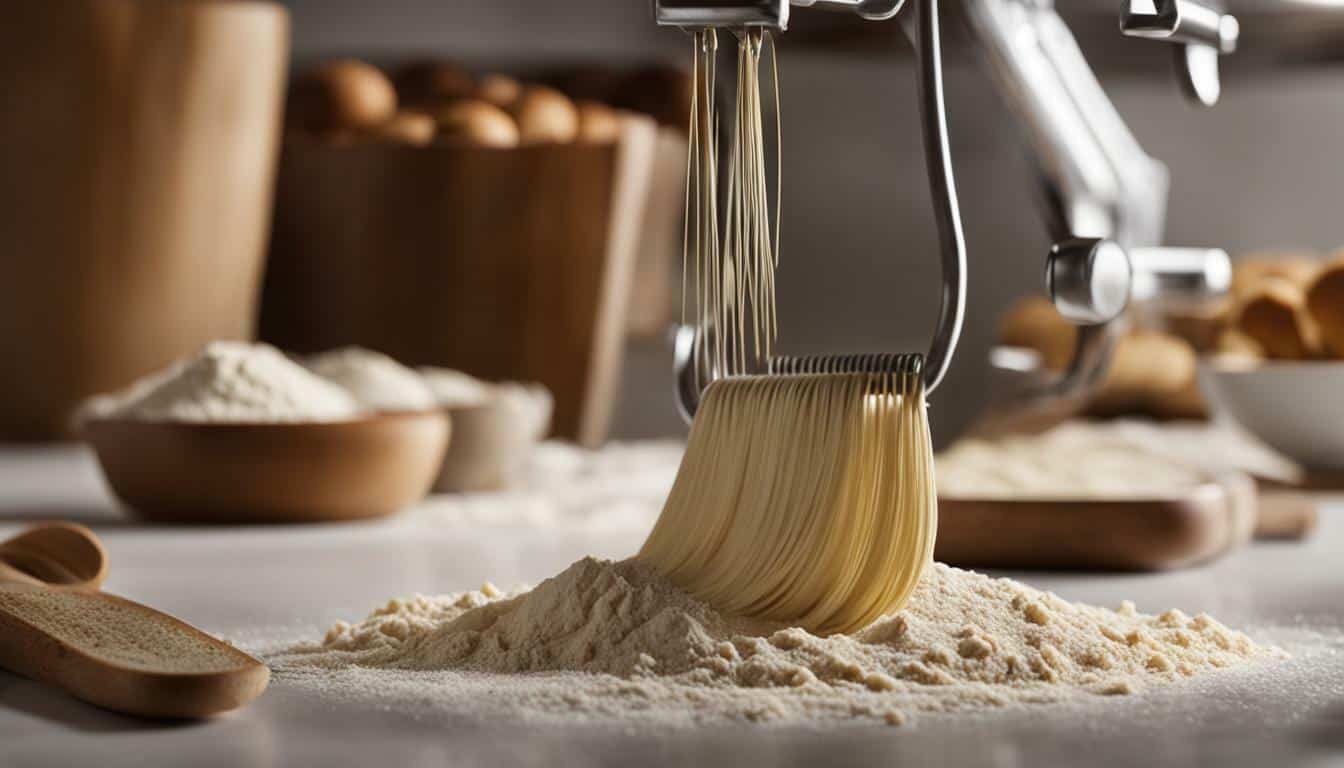
When it comes to mastering the art of bread-making, understanding how to use dough hooks effectively is essential. Whether you’re a seasoned baker or just starting out, dough hooks can take your bread-making game to the next level. In this section, we will explore the process of mastering bread-making and share valuable tips and techniques for using dough hooks.
To begin, let’s talk about the benefits of making bread from scratch. One of the main advantages is the control over ingredients. By making your own bread, you can cater to dietary restrictions and ensure that only the finest quality ingredients go into your creations. Homemade bread also offers a unique taste and texture that you won’t find in store-bought loaves.
Now, let’s dive into the essential tools and ingredients needed for homemade bread. The main ingredients include yeast, warm water, salt, flour, vegetable oil or butter, and sugar. These simple ingredients, when combined and kneaded correctly, create the perfect dough for bread-making.
When it comes to tools, a few key items are a must-have. A mixing bowl, scale, strong spoon or spatula, kitchen thermometer, bowl cover, bakeware, bread lame, and a stand mixer are all essential for successful bread-making. In particular, a stand mixer with dough hooks can make the process easier and more efficient.
Using a stand mixer with dough hooks offers several advantages. First, it allows for even mixing, ensuring all ingredients are thoroughly incorporated. Second, it provides efficient and quick kneading, saving you time and effort. With multiple speed settings, you can adjust the mixer to meet your specific bread-making needs.
Not only does a stand mixer with dough hooks make the dough-making process easier, but it also helps in the development of gluten strands. The dough hooks work to stretch and strengthen the gluten, resulting in a better-textured bread. Additionally, using dough hooks in a stand mixer reduces strain on the wrists compared to kneading by hand.
However, if you prefer kneading by hand, that’s also a viable option. The technique involves working the dough into a smooth ball, which helps form gluten. To check if the dough has been kneaded enough, you can perform the window pane test. Gently stretch a small portion of the dough, and if it forms a thin, translucent window without tearing, it’s ready for proofing.
Now that you have a better understanding of using dough hooks in bread-making, let’s move on to the next section, where we’ll focus on using a stand mixer with dough hooks. We’ll delve into the specific steps, such as properly mixing ingredients in the mixer bowl, adjusting flour or water as needed, and ensuring adequate kneading time.
Key Takeaways:
- Using dough hooks effectively is crucial for mastering bread-making.
- Homemade bread offers control over ingredients and unique flavors.
- The essential tools for bread-making include a mixing bowl, scale, strong spoon or spatula, kitchen thermometer, bowl cover, bakeware, bread lame, and a stand mixer with dough hooks.
- A stand mixer with dough hooks ensures even mixing, efficient kneading, and multiple speed settings.
- Kneading by hand is an alternative to using dough hooks and requires working the dough into a smooth ball.
Understanding the Bread-Making Process
Before we dive into using dough hooks, let’s understand the bread-making process and the tools necessary to achieve delicious homemade bread. Making bread from scratch provides the opportunity to have full control over the ingredients used, allowing you to cater to dietary restrictions and personal preferences.
To get started with bread-making, you will need a few essential tools. A mixing bowl is essential for combining the ingredients and allowing the dough to rise. A scale is useful for accurately measuring the ingredients, ensuring consistency in your bread. A strong spoon or spatula will help you mix the ingredients thoroughly. A kitchen thermometer is crucial for determining the right temperature of the water and ensuring yeast activation. A bowl cover is essential for covering the dough while it rises, preventing it from drying out. Bakeware, such as loaf pans or baking sheets, is necessary for shaping and baking the bread. A bread lame is a handy tool for scoring the dough, allowing it to expand evenly during baking.
Now that you have your tools ready, it’s time to start the bread-making process. Begin by activating the yeast in warm water and allowing it to bloom. In a mixing bowl, combine the flour, salt, and any other dry ingredients specified in your recipe. Gradually add the warm water to the dry ingredients, mixing them together with a strong spoon or spatula until a dough forms. Knead the dough on a lightly floured surface, using the heels of your hands to push and stretch it. The goal is to develop gluten, which gives the dough its structure and elasticity.
Once the dough is smooth and elastic, place it back in the mixing bowl and cover it with a bowl cover. Let the dough rise in a warm place until it has doubled in size. After the first rise, gently punch down the dough to release any air bubbles that may have formed. Shape the dough into the desired shape, whether it’s a traditional loaf, rolls, or a specialty shape. Allow the shaped dough to go through a second rise, and once it has risen again, it’s time to bake it in the preheated oven. Follow the recipe instructions for baking time and temperature.

With an understanding of the bread-making process and the necessary tools, you are ready to embark on your bread-making journey. Whether you choose to knead by hand or utilize the convenience of a stand mixer with dough hooks, the key is to enjoy the process and savor the delicious results of your homemade bread.
The Role of Stand Mixers in Bread-Making
Stand mixers play a crucial role in bread-making, offering a range of benefits that make the process easier and more efficient. With their even mixing capabilities, efficient kneading action, and multiple speed settings, stand mixers are a valuable tool for any bread enthusiast.
One of the key advantages of using a stand mixer is its ability to develop gluten strands in the dough. Gluten is a protein that gives bread its structure and elasticity. By using a stand mixer, you can achieve a thorough and consistent kneading, ensuring that the gluten is evenly developed throughout the dough.
Another advantage of using a stand mixer is that it helps reduce strain on the wrists. Kneading dough by hand can be a laborious task, especially when dealing with larger quantities. However, with a stand mixer, you can effortlessly knead the dough without exerting excessive force on your wrists.
By using a stand mixer with multiple speed settings, you have greater control over the mixing process. Different stages of bread-making require different speeds, and a stand mixer allows you to adjust the speed to suit each stage. Whether you’re mixing ingredients, kneading the dough, or incorporating additional elements, a stand mixer’s versatility ensures optimal results.

| Benefits | |
|---|---|
| Even Mixing | Stand mixers provide consistent and uniform mixing of ingredients. |
| Efficient Kneading | Stand mixers knead the dough thoroughly and evenly, developing gluten strands. |
| Multiple Speed Settings | Stand mixers offer various speed options to suit different stages of bread-making. |
| Reducing Strain on Wrists | Using a stand mixer eliminates the need for manual kneading and reduces strain on the wrists. |
“Stand mixers are a game-changer in the world of bread-making. They make the process more efficient and produce consistent results. Whether you’re a beginner or an experienced baker, a stand mixer is an invaluable tool to have in your kitchen.”
In conclusion, stand mixers are an essential tool for bread-making enthusiasts. They offer efficient mixing, thorough kneading, and the flexibility of multiple speed settings. By utilizing a stand mixer, you can achieve professional-quality bread with ease while enjoying the process. So go ahead and unleash your creativity in the kitchen, armed with a reliable stand mixer and the desire to master the art of bread-making.
Kneading Bread Dough with Dough Hooks
There are different methods for kneading bread dough, including kneading by hand and using dough hooks. Let’s explore these techniques in detail.
Kneading dough by hand is a traditional method that allows you to have a hands-on experience with your bread-making. To knead by hand, start by gathering the dough into a rough ball. Push the dough away from you with the heel of your hand, then fold it back towards you and rotate it 90 degrees. Continue this motion, adding more flour if necessary, until the dough becomes smooth and elastic. This process helps develop gluten, giving your bread structure and texture.
| Kneading By Hand | Advantages |
|---|---|
| Hands-on experience | Control over dough consistency |
| Ability to feel the dough’s texture | Flexibility to adjust kneading time |
| Deep connection with the baking process | Minimal equipment needed |
If you prefer a more convenient method, using dough hooks with a stand mixer can save you time and effort. Dough hooks are specifically designed to knead dough efficiently and thoroughly. To use dough hooks, attach them to your stand mixer and place the ingredients in the mixing bowl. Start the mixer on a low speed to combine the ingredients, then increase the speed to knead the dough. Keep an eye on the dough’s consistency, adding more flour or water as needed. The use of dough hooks in a stand mixer is particularly useful for those who bake bread occasionally or have wrist strain concerns.
| Using Dough Hooks | Advantages |
|---|---|
| Efficient and quick kneading | Consistent results |
| Reduced strain on wrists | Ability to multitask during kneading |
| Multiple speed settings for control | Even distribution of ingredients |
Whichever method you choose, kneading bread dough is a crucial step in the bread-making process. It helps develop gluten, which gives the bread its structure and chewiness. Additionally, kneading ensures that the ingredients are evenly distributed, resulting in a well-balanced loaf. Whether you enjoy the tactile experience of kneading by hand or prefer the convenience of dough hooks, mastering this technique is key to creating delicious homemade bread.

In the next section, we will focus on using a stand mixer with dough hooks and explore the specific steps involved in achieving optimal results.
Using a Stand Mixer with Dough Hooks
When using a stand mixer with dough hooks, it is important to follow a specific process to achieve the best results. Let’s dive into the step-by-step guide.
1. Mixing in the mixer bowl: Start by warming the mixer bowl with warm water to create an ideal environment for the yeast. Then, add the measured dry ingredients, including flour, salt, and sugar, to the bowl.
2. Adjusting flour or water: As you mix the ingredients, you may need to adjust the flour or water to achieve the perfect consistency. If the dough appears too dry, add small amounts of warm water. If it’s too wet and sticky, sprinkle in a bit more flour. Aim for a dough that is smooth and elastic.
3. Adequate kneading time: Kneading is essential for developing gluten and giving the bread structure. Use the dough hooks at a medium-low speed setting to knead the dough for about 8-10 minutes, or until it becomes smooth and springs back when gently pressed with your fingertips.
4. Checking for windows: To determine if the dough is properly kneaded, perform the window pane test. Take a small piece of dough and gently stretch it between your fingers. If it forms a thin, translucent membrane without breaking, you’ve achieved the desired gluten development.
5. Rising and baking stages: Once the dough is kneaded, remove it from the mixer bowl and place it in a lightly oiled bowl. Cover with a clean kitchen towel or plastic wrap and let it rise in a warm, draft-free area until it doubles in size. After the first rise, punch down the dough and shape it into the desired loaf or rolls. Allow it to rise again until it reaches the desired size before baking in a preheated oven.
| Mixing in the mixer bowl | Adjusting flour or water | Adequate kneading time | Checking for windows | Rising and baking stages |
|---|---|---|---|---|
| Warm the mixer bowl with warm water | Adjust flour or water to achieve desired consistency | Knead for 8-10 minutes until smooth and elastic | Perform the window pane test to check gluten development | Rise dough twice, shape, and bake in a preheated oven |
By following these steps and using a stand mixer with dough hooks, you can effortlessly create homemade bread that is sure to impress. Remember to adjust the flour or water as needed, knead for an adequate amount of time, and check for the window pane effect before proceeding with rising and baking. With practice and the right techniques, you’ll be able to achieve bakery-worthy results right in your own kitchen.

If you’re looking for a convenient alternative to traditional bread-making methods, a bread machine might be the perfect choice. With a bread machine, you can enjoy freshly baked bread without the need for extensive manual labor. These machines are designed to handle the entire bread-making process, from mixing and kneading the dough to proofing and baking. They offer a hassle-free approach to bread-making, allowing you to enjoy homemade bread with minimal effort.

Bread machines are equipped with various features that make the bread-making process easy and efficient. They come with pre-programmed settings for different types of bread, allowing you to choose the desired crust color and loaf size. Some machines even offer additional attachments and accessories, such as gluten-free settings, fruit and nut dispensers, and specialty bread programs.
Using a bread machine is simple. Just add the ingredients to the machine’s bread pan in the specified order, select the desired settings, and let the machine do the work. The machine will mix and knead the dough, control the rising time, and bake the bread to perfection. You can even set a delay timer to have fresh bread ready for you in the morning or when you come home from work.
Benefits of Using a Bread Machine:
- Convenience: Bread machines take the guesswork out of bread-making and save you time and effort.
- Consistency: The pre-programmed settings ensure consistent results every time you bake.
- Customization: Adjust the settings and ingredients to suit your taste and dietary preferences.
- Versatility: Some machines offer additional settings for making pizza dough, pasta dough, jams, and more.
With a bread machine, you can enjoy the delightful aroma of fresh bread filling your home without the need for extensive manual labor. It’s a convenient and easy way to satisfy your bread cravings and experiment with different recipes and flavors. So, why not give a bread machine a try and discover the joy of homemade bread with just a press of a button?
| Pros | Cons |
|---|---|
| Convenient and time-saving | Limited control over the bread-making process |
| Consistent results | Requires space for storage |
| Customizable settings | Can be noisy during operation |
Mastering the Art of Bread-Making and Dough Hooks
Becoming a master bread-maker is within your reach. Let’s explore the key techniques and tips for effective dough hook usage. To begin, gather all the essential tools and ingredients for homemade bread. You will need yeast, warm water, salt, flour, vegetable oil or butter, and sugar. In terms of equipment, a mixing bowl, scale, strong spoon or spatula, kitchen thermometer, bowl cover, bakeware, bread lame, and a stand mixer are important.
Using a stand mixer with dough hooks provides several advantages. It allows for even mixing, efficient and quick kneading, and offers multiple speed settings. With a stand mixer, you can develop gluten strands, which are essential for a good bread texture, while reducing strain on your wrists. KitchenAid stand mixers are highly recommended for their quality and performance. They also offer additional attachments and accessories that enhance the bread-making process.
If you prefer kneading dough by hand, you can still achieve great results. Work the dough into a smooth ball to form gluten, which gives the bread its structure. You can test the dough’s readiness by using the window pane test, where a small piece of dough is stretched gently to see if it forms a thin, translucent window. Kneading in a stand mixer is a convenient option, especially for occasional bread baking. To ensure success, mix the ingredients directly in the mixer bowl, add more flour or water as needed, knead for an adequate amount of time, check for windows to determine readiness, and proceed with the rising and baking stages.
If you prefer a hands-off approach, a bread machine can be a valuable tool for baking bread. It simplifies the process and allows you to enjoy fresh bread with minimal effort. However, using a stand mixer or kneading by hand provides a greater level of control and satisfaction.

To master bread-making and effectively use dough hooks, practice and experimentation are key. By understanding the techniques and tips shared here, you will be well on your way to becoming a bread-making pro. So, roll up your sleeves, gather your ingredients, and let the dough hooks work their magic!
Recommendations: KitchenAid Stand Mixers
When it comes to stand mixers for bread-making, KitchenAid is a reliable choice. Let’s explore the reasons why they are highly recommended. KitchenAid stand mixers are known for their exceptional performance, durability, and versatility, making them a favorite among bakers and cooking enthusiasts.
One of the key advantages of KitchenAid stand mixers is their powerful motor, which provides consistent and reliable mixing. Whether you’re kneading dough, whisking egg whites, or creaming butter and sugar, the KitchenAid stand mixer can handle it all with ease. The multiple speed settings allow for precise control, ensuring optimal results every time.
Another reason why KitchenAid stand mixers are so popular is the wide range of bread-making attachments available. These attachments can transform your stand mixer into a versatile kitchen tool capable of performing various tasks. From dough hooks for kneading to pasta rollers and cutters, there is an attachment to suit every bread-making need.
With their sleek design and sturdy construction, KitchenAid stand mixers are built to last. They are designed to withstand the rigors of heavy-duty baking, providing years of reliable service. Additionally, KitchenAid offers excellent customer support, ensuring that you can rely on their expertise whenever you need assistance.
| Benefits of KitchenAid Stand Mixers |
|---|
| Powerful motor for consistent mixing |
| Multiple speed settings for precise control |
| Wide range of bread-making attachments available |
| Sleek design and sturdy construction for durability |
| Excellent customer support |

Investing in a KitchenAid stand mixer is a decision that will greatly enhance your bread-making experience. With their impressive performance, versatility, and durability, these stand mixers are a must-have for any aspiring baker or seasoned bread-making enthusiast.
Tips for Successful Dough Hook Usage
To achieve successful dough hook usage, it’s important to follow these tips and use effective kneading techniques:
- Start with the right dough consistency: Before using dough hooks, make sure your dough has the right consistency. It should be slightly sticky but not too wet or dry. Adjust the flour or water as needed to achieve the desired texture.
- Monitor the kneading process: While using dough hooks in a stand mixer, keep an eye on the dough as it kneads. You want the dough to come together and form a smooth ball without sticking to the sides of the bowl. Avoid overmixing, as it can result in tough bread.
- Use the window pane test: To determine if your dough is ready for proofing, perform the window pane test. Gently stretch a small portion of the dough between your fingers. If it becomes thin and translucent without tearing, then the gluten has developed properly, and you can proceed with the next steps.
- Follow rising and baking instructions: After kneading the dough with dough hooks, follow the specific rising and baking instructions for your bread recipe. This typically includes allowing the dough to rise in a warm place until it doubles in size and then baking it in a preheated oven for the recommended time and temperature.
Remember, practice makes perfect when it comes to using dough hooks. With time and experience, you will become more comfortable and confident in your bread-making skills.
| Benefits of successful dough hook usage |
|---|
|
Remember, the key to successful dough hook usage lies in understanding your dough and monitoring the kneading process closely. Follow these tips and techniques to achieve great results every time. Happy bread-making!
Recommended Dough Hook Attachment for KitchenAid Stand Mixers
If you’re using a KitchenAid stand mixer, the recommended dough hook attachment is the KitchenAid Coated Spiral Dough Hook. This attachment is specifically designed to knead dough effectively, ensuring optimal gluten development and a smooth, consistent texture. Its unique spiral design helps the dough hook to reach every corner of the mixing bowl, resulting in thorough and even mixing.
With the KitchenAid Coated Spiral Dough Hook, you can confidently tackle any bread recipe with ease. Whether you’re a seasoned bread-maker or just starting your baking journey, this attachment is a valuable tool that will enhance your dough hook usage and elevate your bread-making skills.

In addition to the tips mentioned earlier, there are more best practices to keep in mind when using dough hooks. Let’s uncover them now.
1. Adjust the speed: When using a stand mixer with dough hooks, it’s important to start the mixer on a low speed to prevent the flour from scattering. Once the dry ingredients are incorporated, gradually increase the speed to achieve proper dough consistency. Pay attention to the manufacturer’s instructions for your specific stand mixer model.
2. Proper dough hydration: Achieving the right dough hydration is crucial for a successful outcome. If the dough feels too dry, add small amounts of warm water; if it’s too sticky, add a little more flour. The dough should be soft, elastic, and slightly tacky to the touch.
3. Resting and proofing: After kneading the dough, let it rest for about 10-15 minutes. This allows the gluten strands to relax, making the dough easier to shape. When proofing the dough, cover it with a clean kitchen towel or plastic wrap to prevent a skin from forming on the surface.
| Tips: | Explanation: |
|---|---|
| Adjust the speed | Start the mixer on a low speed, gradually increase for proper dough consistency. |
| Proper dough hydration | Ensure the dough is soft, elastic, and slightly tacky; adjust flour or water as needed. |
| Resting and proofing | Allow the dough to rest before shaping; cover it during proofing to prevent a skin from forming. |
4. Experiment with different flours: While all-purpose flour is commonly used for bread-making, feel free to explore different types of flour such as whole wheat, rye, or spelt. These flours can add unique flavors and textures to your bread. Just remember that different flours may require adjustments in hydration or rising time.
5. Use a digital kitchen thermometer: To ensure your bread is properly baked, use a digital kitchen thermometer to check the internal temperature. The bread should reach an internal temperature of around 190-205°F (88-96°C) for a perfectly baked loaf.

“The key to successful bread-making lies in the details. Pay attention to the dough consistency, hydration, and proofing time. Practice and experimentation will help you unlock the secrets of creating delicious homemade bread.” – Me
By following these additional tips and best practices, you’ll be well on your way to becoming a bread-making pro. Remember, practice makes perfect, so don’t be afraid to try new techniques and recipes. Happy baking!
Conclusion
By mastering the art of bread-making and effectively using dough hooks, you can become a true bread artist. Let this guide be your companion in the journey towards perfect, homemade bread!
Homemade bread offers a world of possibilities and benefits. With control over the ingredients, you can cater to specific dietary restrictions and create bread that suits your preferences. The key ingredients for homemade bread include yeast, warm water, salt, flour, vegetable oil or butter, and sugar.
To achieve success in bread-making, it’s important to have the right tools. A mixing bowl, scale, strong spoon or spatula, kitchen thermometer, bowl cover, bakeware, bread lame, and a stand mixer are essential. Stand mixers play a crucial role in the bread-making process by allowing for even mixing, efficient kneading, and offering multiple speed settings. They help develop gluten strands and reduce strain on the wrists.
If you prefer kneading by hand, it is still a viable option. Work the dough into a smooth ball to form gluten and perform the window pane test to determine dough readiness. However, using a stand mixer with dough hooks can be a convenient alternative, especially for occasional bread baking. Just make sure to mix the ingredients in the mixer bowl, adjust flour or water as needed, knead for the right amount of time, check for windows to determine dough readiness, and proceed with the rising and baking stages.
If you’re looking for a more automated approach, consider using a bread machine. These devices offer baking convenience and come with additional attachments and accessories that can enhance the bread-making process.
With the right tools, techniques, and practice, you can master the art of bread-making and effectively use dough hooks. So, roll up your sleeves, gather your ingredients, and let the aroma of freshly baked bread fill your kitchen. Enjoy the satisfaction of creating bread from scratch and delight in the delicious results!
FAQ
Q: What are the essential ingredients for homemade bread?
A: The main ingredients for homemade bread include yeast, warm water, salt, flour, vegetable oil or butter, and sugar.
Q: What are the essential tools for bread-making?
A: Essential tools for bread-making include a mixing bowl, scale, strong spoon or spatula, kitchen thermometer, bowl cover, bakeware, bread lame, and a stand mixer.
Q: Why should I use a stand mixer for bread-making?
A: Using a stand mixer for bread-making allows for even mixing, efficient and quick kneading, and multiple speed settings. It helps develop gluten strands and reduces strain on the wrists.
Q: Is it possible to knead bread dough by hand?
A: Yes, it is possible to knead bread dough by hand. It involves working the dough into a smooth ball to form gluten. The dough can be tested using the window pane test.
Q: How do I effectively use a stand mixer with dough hooks?
A: To effectively use a stand mixer with dough hooks, mix the ingredients right in the mixer bowl, add more flour or water as needed, knead for an adequate amount of time, check for windows to determine readiness, and proceed with the rising and baking stages.
Q: Can I use a bread machine to bake bread?
A: Yes, a bread machine can be useful for baking bread. It offers convenience and automates the bread-making process. Additional attachments and accessories can enhance the bread-making experience.
Q: How can I master bread-making and effectively use dough hooks?
A: To master bread-making and effectively use dough hooks, practice the techniques and tips provided in this article. With the right tools and techniques, anyone can become a bread-making pro.
Q: Are KitchenAid stand mixers recommended for bread-making?
A: Yes, KitchenAid stand mixers are recommended for bread-making. They offer additional attachments and accessories that can enhance your bread-making experience.
Q: What are some tips for successful dough hook usage?
A: Some tips for successful dough hook usage include using effective kneading techniques, monitoring the dough as it is being kneaded, and adjusting the ingredients as needed.
Q: Do you have any additional tips and best practices?
A: Yes, some additional tips and best practices include using the appropriate kneading time, checking for windows to determine dough readiness, and following the rising and baking stages accurately.
How Should I Add Ingredients to the Bread Machine When Using Dough Hooks?
When using dough hooks in a bread machine, it is essential to know the best order for bread machine ingredients. Start by adding liquids like water or milk, followed by fat sources like butter or oil. Then, add dry ingredients such as flour, salt, and sugar. Lastly, create a small well in the center and add yeast. This sequence ensures optimal mixing and rising of the dough.

Leave a Reply